The 3 Stages in Secure Product Lifecycle Management
Nearly every embedded software developer working in the IoT space is now building secure devices. Developers have been mostly focused on how to handle secure applications and the basic microcontroller technologies such as how to use Arms TrustZone or leverage multicore processors. A looming problem that many companies and teams are overlooking is that figuring out how to develop secure applications is just the first step. There are three stages to secure product lifecycle management and in today’s post, we will review what is involved in each stage.
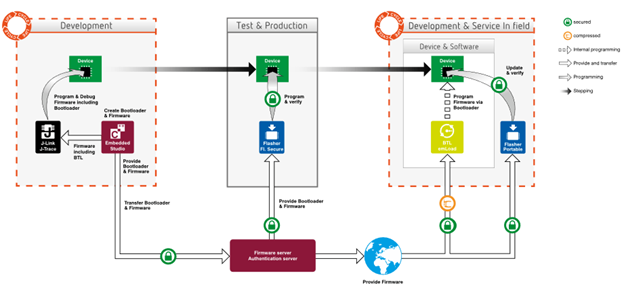
Image Source: SEGGER.com As a quick overview, the stages, which can be seen in the diagram below, are:
- Development
- Test and Production Deployment
- Maintenance and In-field Servicing
Let us look at each of these stages in a little more detail.
Stage #1 – Development
Development is probably the area that most developers are the most familiar with, but at the same time, the area that they are learning to adapt to the most. Many developers have designed and built systems without ever having to take security into account. Development involves a lot more than just deciding which components to isolate and how to separate the software into secure and non-secure regions.
For example, during the development phase developers now need to learn how to develop in the environment where a secure bootloader is in place. They need to consider how to handle firmware fallbacks, if they are allowed and if so, under what conditions. Firmware images may need to be compressed on top of the need for authentication.
While the development stage has become more complicated, developers should not struggle too much to extrapolate their past experiences to developing secure firmware successfully.
Stage #2 – Test and Production Deployment
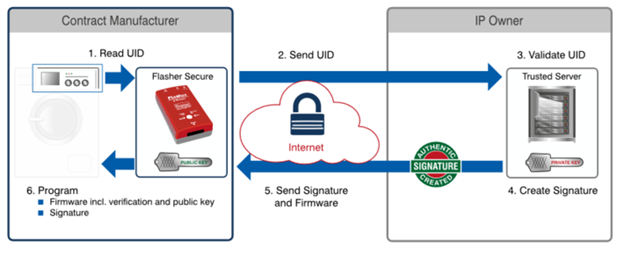
The area that developers will probably struggle with the most is the test and production deployment stage. Testing secure software requires additional steps to be taken that authenticate debug hardware so that the developer can access secure memory regions to test their code and successfully debug it. Even more importantly, care must be taken to install that secure software onto a product during production.
There are several ways this can be done, but one method is to use a secure flashing device like SEGGERS Flasher Secure. These devices can follow a multistep process that involves validating a user ID which allows the secure firmware to be installed on the device. The devices themselves limit how many and on what devices the firmware can be installed which helps to protect a team’s intellectual property and prevents unauthorized production of a product.
Stage #3 – Maintenance and In-field Servicing
Finally, there is the maintenance and in-field servicing stage which is a partial continuation of the development phase. Once a product has been deployed into the field, it needs to be securely updated. Updates can be done manually in-field, or they can be done using an over-the-air update process. This involves a device being able to contact a secure firmware server that can compress and encrypt the image and transport it to the device. Once the device has received the image, it must decrypt, decompress and validate the contents of the image. If everything looks good, the image can then be loaded as the primary firmware for the device.
Conclusions
There is much more to designing and deploying a secure device than simply developing a secure application. The entire process is broken up into three main stages that we have looked at in greater detail today. Unfortunately, we have only just scratched the surface!
Category: Uncategorized


